Why Use Dotenv with Webpack?
Dotenv is a zero-dependency module that loads environment variables from a .env file into process.env. This enables developers to separate secrets from their source code, making it easier to manage configurations across different environments and reducing the risk of sensitive data exposure.
Webpack is a static module bundler for modern JavaScript applications. When Webpack processes an application, it internally builds a dependency graph which maps every module your project needs and generates one or more bundles. This simplifies the process of turning complex sets of dependencies into a manageable output.
There are several reasons developers use Dotenv with Webpack:
- Managing environment variables in frontend projects: By using environment variables, developers can keep sensitive information like API keys and database passwords out of the source code, while maintaining a secure and flexible codebase. This enhances security and makes it easier to update settings without touching the code directly.
- Simplifying configuration across different environments: By utilizing environment-specific
.envfiles (for example, having a.envfile for dev, test, and prod), developers can easily switch between different settings without changing the codebase. This ensures that applications behave correctly in various contexts by changing the environment variables. Combining Dotenv and Webpack automates the process of selecting the appropriate configuration for each environment. - Avoiding hard-coding secrets: When dealing with sensitive information such as API keys, database credentials, and secret tokens, hardcoding this data directly into the source code is a bad practice that risks publicly exposing it. By using Dotenv with Webpack, developers can manage such sensitive information outside the codebase.
Note: Keep in mind that environment variables are stored in plaintext and visible to anyone with access to your environment, so you should consider additional security mechanisms, such as encryption and secrets management systems.
In this article:
What Is the dotenv-webpack Plugin?
The dotenv-webpack plugin is a secure wrapper around the dotenv library and Webpack’s DefinePlugin. It allows developers to manage their application’s environment variables more securely by automatically loading these variables from a .env file into the Webpack build process.
This integration ensures that only the environment variables explicitly used in the code are included in the output bundle, preventing accidental exposure of sensitive data. Unlike directly using dotenv, dotenv-webpack simplifies the process of integrating environment variables into Webpack projects.
It performs a text replacement in the resulting bundle for any instances of process.env, ensuring that environment variables are handled correctly during the build process. This approach minimizes runtime overhead and enables a smoother development workflow.
Dotenv-webpack Example
To demonstrate how dotenv-webpack works, let’s start with a simple .env file. This file contains environment variables that your application might need. For example:
// .env
DB_HOST=127.0.0.1
DB_PASS=foobar
S3_API=mysecretkey
Next, incorporate the dotenv-webpack plugin into your Webpack configuration. This is done by requiring the plugin and adding it to the plugins array in the webpack.config.js file:
// webpack.config.js
const Dotenv = require('dotenv-webpack');

module.exports = {
  ...
  plugins: [
    new Dotenv()
  ]
  ...
};
Install the required packages, webpack, webpack-cli, and dotenv webpack.
Finally, use these environment variables in the code as needed. For example, to access the database host, you would reference process.env.DB_HOST. When Webpack processes this code, it replaces instances of process.env.DB_HOST with the actual value from the .env file, “127.0.0.1“, in the bundled output:
// file1.js
console.log(process.env.DB_HOST);
// Outputs: '127.0.0.1' in the console when run

// bundle.js (simplified)
console.log('127.0.0.1');
This setup ensures that only variables explicitly used are included in the final bundle, enhancing security by preventing unintentional exposure of sensitive data not referenced directly in your codebase.
Tips From the Expert
In my experience, here are tips that can help you better manage environment variables in Webpack using the Dotenv plugin:
-
Avoid bundling unused environment variables Even though
dotenv-webpackonly includes variables used in your code, always verify the bundle output using tools likewebpack-bundle-analyzerto ensure no sensitive data is accidentally bundled. Manually checkDefinePlugin‘s output for any unwanted exposure. -
Consider using
dotenv-expandfor advanced variable interpolation If your project needs more complex variable references (e.g., defining one variable based on another), integratedotenv-expand. This is especially helpful when managing paths or dynamically constructing API endpoints across environments. -
Set environment variable defaults for fallbacks In case some variables are missing, use Webpack’s
DefinePluginto define sensible defaults directly in your Webpack configuration. This avoids crashes when specific environment variables are missing, especially in development or staging. -
Integrate dotenv-webpack with CI/CD pipelines For automated builds, ensure the
.envfiles are securely handled within CI/CD pipelines. Use tools likeVaultorAWS Secrets Managerto inject these variables dynamically during the build, ensuring that.envfiles never get committed or exposed. -
Use webpack’s
modesetting for environment-based optimizations In addition to managing environment variables, leverage Webpack’smodesetting (developmentorproduction) to apply specific optimizations for different environments. This can reduce bundle sizes and enhance performance without manual configuration.

Tutorial: Using a .ENV file with React and Webpack
To integrate environment-specific .env files in a React and Webpack setup:
- Start by installing
dotenv-webpack. This is achieved by running the commandnpm install dotenv-webpack --save-dev. - Next, create separate
.envfiles for different environments, like.env.developmentfor development and.env.productionfor production. Additionally, have a.envfile for common variables across environments. - In your
webpack.config.js, configuredotenv-webpackto load the appropriate.envfile based on theNODE_ENVenvironment variable. Here’s a sample configuration:
const Dotenv = require('dotenv-webpack');
module.exports = (env) => {
  const isProduction = env.NODE_ENV === 'production';
  const dotenvFilename = isProduction ? '.env.production' : '.env.development';
  return {
    plugins: [
      new Dotenv({
        path: dotenvFilename,
      })
    ],
  };
};
This configuration dynamically selects the correct environment file, ensuring your application uses the right set of variables.
- It’s crucial to update your
package.jsonscripts to pass theNODE_ENVvariable to Webpack commands accordingly:
{
  "scripts": {
    "start": "NODE_ENV=development webpack serve --mode development --open",
    "build": "NODE_ENV=production webpack --mode production"
  }
}
The output should look something like this:

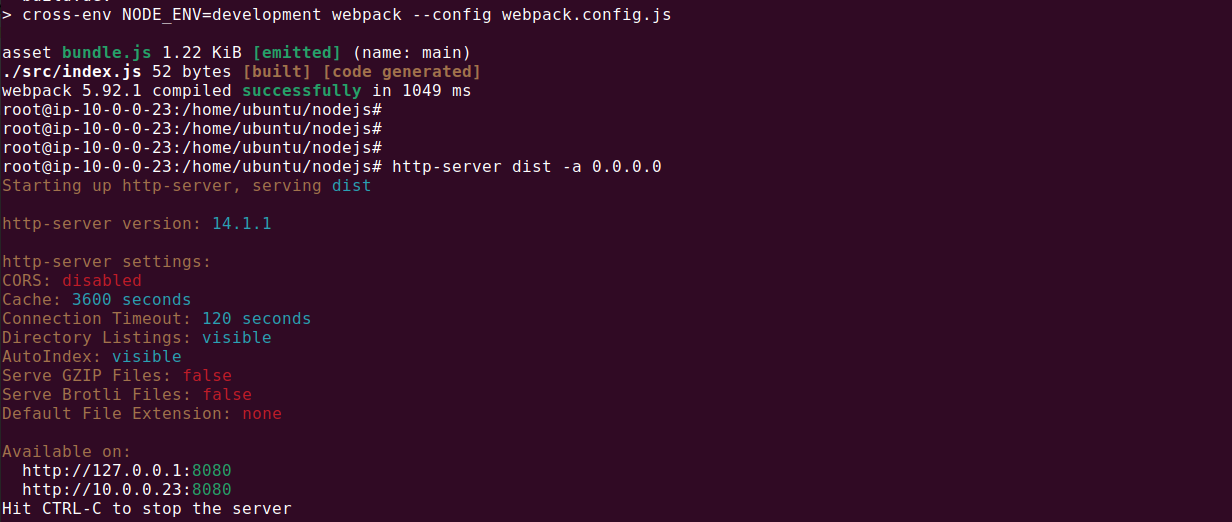
You can then see the environment variable in your web browser by accessing the local host:

Managing Environment Variables with Configu
Configu is a configuration management platform comprised of two main components:
Configu Orchestrator
As applications become more dynamic and distributed in microservices architectures, configurations are getting more fragmented. They are saved as raw text that is spread across multiple stores, databases, files, git repositories, and third-party tools (a typical company will have five to ten different stores).
The Configu Orchestrator, which is open-source software, is a powerful standalone tool designed to address this challenge by providing configuration orchestration along with Configuration-as-Code (CaC) approach.
Configu Cloud
Configu Cloud is the most innovative store purpose-built for configurations, including environment variables, secrets, and feature flags. It is built based on the Configu configuration-as-code (CaC) approach and can model configurations and wrap them with unique layers, providing collaboration capabilities, visibility into configuration workflows, and security and compliance standardization.
Unlike legacy tools, which treat configurations as unstructured data or key-value pairs, Configu is leading the way with a Configuration-as-Code approach. By modeling configurations, they are treated as first-class citizens in the developers’ code. This makes our solution more robust and reliable and also enables Configu to provide more capabilities, such as visualization, a testing framework, and security abilities.